Imagine facing an unexpected situation where food is scarce. Wouldn't it be reassuring to know you have a survival kit packed and ready?
Creating your own food survival kit isn't just smart; it's essential for peace of mind. You never know when emergencies might strike, and having the right provisions can make all the difference. This guide will walk you through simple steps to build a kit tailored to your needs, ensuring you're prepared for anything.
With easy tips and practical advice, you'll see how straightforward it is to stock up on essentials that could be lifesaving. Keep reading to discover how you can make a kit that keeps you safe and secure.
Choosing The Right Container
Selecting the right container is crucial for a successful food survival kit. Opt for durable, airtight containers to keep food fresh and safe. Choose sizes that fit your storage space and needs.
Creating a food survival kit is an essential step in preparing for emergencies. But before you start packing, choosing the right container is crucial. The container you select will protect your food and keep it fresh. It’s not just about size; it’s about durability and efficiency. You want something that can withstand the elements and keep your supplies safe.
Durability Matters
When I first assembled my survival kit, I grabbed a regular plastic bin from my garage. A few weeks later, I found it cracked and less reliable than I thought. Choose a container that can endure rough handling and extreme conditions. Look for materials like heavy-duty plastic, metal, or even waterproof options.
Size And Portability
Balancing size and portability is key. A massive container holds more, but can you carry it in a crisis? Aim for a manageable size that fits comfortably in your vehicle or home. Ensure it’s light enough for you to move without hassle. Consider containers with wheels or handles for easy transport.
Airtight And Pest-proof
Once, I opened my kit only to find ants had invaded. You don’t want nature’s critters feasting on your supplies. Choose a container that seals tightly to prevent pests and moisture from ruining your food. Check if the lid locks securely and test it before committing.
Organization Features
How easy is it to find items in your kit? Opt for containers with compartments or organizers. They help keep things tidy and accessible. This way, you’ll avoid rummaging through everything to find what you need. Clear containers can also be beneficial, allowing you to see what’s inside at a glance.
Cost Vs. Quality
You might be tempted to save money with a cheaper container. But think about the long-term value. Investing a bit more in a high-quality container can save you from costly food spoilage. Consider this as a long-term investment in your safety.
What kind of container have you considered for your survival kit? The decision you make now could impact your preparedness later. Ensure that your choice aligns with your needs and environment.
Selecting Non-perishable Foods
Creating a food survival kit is essential for emergencies. Choosing the right non-perishable foods is crucial. These foods must last a long time and provide nutrition. They should be easy to store and prepare.
Understanding Non-perishable Foods
Non-perishable foods do not spoil quickly. They can be stored without refrigeration. These foods include canned goods, dried fruits, and grains. They are perfect for survival kits.
Advantages Of Non-perishable Foods
These foods have a long shelf life. They are safe to eat for years. Non-perishable foods are often lightweight. They are easy to carry in emergencies.
Canned Goods
Canned goods are a staple in survival kits. They include vegetables, fruits, and meats. Cans keep food fresh and safe. Always check expiration dates.
Dried Fruits And Nuts
Dried fruits are nutritious and sweet. Nuts provide healthy fats and protein. Both are great for energy. They are easy to pack and store.
Grains And Pasta
Grains like rice and pasta are filling. They provide carbohydrates and energy. Store them in airtight containers. Cook them easily with minimal water.
Instant Foods
Instant foods include soups and noodles. They are quick and easy to prepare. Just add hot water. They are perfect for emergencies.
Energy Bars
Energy bars are compact and nutritious. They provide quick energy. They are ideal for quick snacks. Choose bars with high protein.
Store foods in a cool, dry place. Keep them away from sunlight. Use airtight containers for freshness. Rotate stock regularly.
Prioritizing Nutritional Value
Creating a food survival kit is crucial for emergencies. While stocking up, prioritizing nutritional value is vital. Balanced nutrition ensures energy and health during challenging times. Focus on foods rich in vitamins, minerals, and essential nutrients.
Understanding Nutritional Basics
Start with understanding nutritional basics. Proteins, carbohydrates, and fats are key. Proteins build and repair tissues. Carbohydrates provide energy. Fats store energy and support cell growth. Choose foods that offer these elements.
Choosing Protein-rich Foods
Proteins are vital for survival kits. Include canned beans, lentils, and nuts. Canned meats like chicken or tuna are excellent options. These foods are versatile and easy to store.
Incorporating Healthy Carbohydrates
Healthy carbohydrates are energy sources. Opt for whole grains like oats, rice, and pasta. Dried fruits like raisins and apricots are nutritious snacks. These foods have long shelf lives and provide sustained energy.
Adding Essential Fats
Fats are important for energy and health. Include items like canned fish and nuts. Nut butters like peanut or almond are rich in fats. Choose foods that balance your diet.
Including Vitamins And Minerals
Vitamins and minerals boost immunity and health. Include canned vegetables and fruits. Multivitamins can supplement essential nutrients. Select foods that enhance overall health.
Ensuring Shelf Stability
Shelf stability is crucial for survival kits. Choose foods with long shelf lives. Vacuum-sealed or canned items are ideal. Store foods properly to maintain their quality.
Incorporating Hydration Solutions
Creating a food survival kit? Include hydration solutions like water packets or purifying tablets. Essential for keeping you safe. Stay prepared.
When preparing a food survival kit, hydration is key. Staying hydrated is crucial for survival. Incorporating hydration solutions ensures your kit is complete. Water storage and purification are essential. Let's dive into the essentials of hydration in your survival kit.
Water Storage
Water is the foundation of life. Store enough water for your needs. Use durable, leak-proof containers. Consider collapsible water bottles for space-saving. Each person needs about a gallon of water per day. Plan accordingly.
Water Purification
Clean water is not always available. Include purification methods in your kit. Water filters are effective and easy to use. Purification tablets are compact and reliable. Boiling water is a simple purification method. Always have a backup plan.
Electrolyte Solutions
Hydration is more than just water. Electrolytes are vital for body functions. Include electrolyte powders or tablets in your kit. These help maintain energy levels. They are lightweight and easy to pack.
Hydration Monitoring
Track your water intake. Dehydration affects physical and mental health. Signs include dry mouth and dizziness. Keep a hydration schedule. Ensure everyone in your group stays hydrated. Incorporating hydration solutions in your survival kit is vital. Proper planning ensures safety and comfort. Stay prepared for any situation.
Adding Cooking Tools
Adding cooking tools to your food survival kit ensures you're prepared. These tools are crucial for cooking and food preparation in emergencies. With the right items, you'll feel more equipped to handle any situation. Let's explore the essential cooking tools to include in your kit.
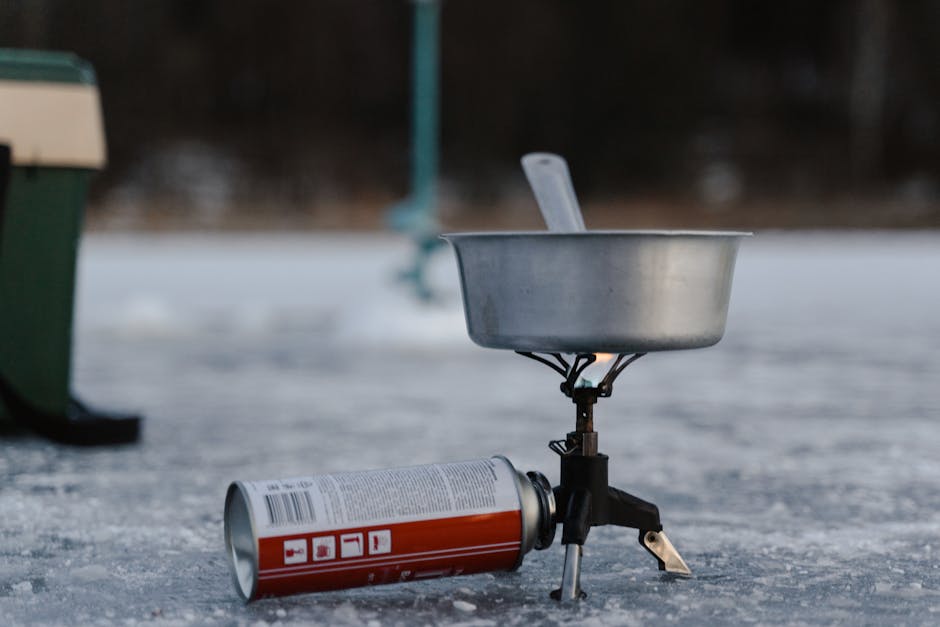
Portable Stove
A portable stove is a must-have. It allows you to cook meals without an open fire. Choose a compact, lightweight model for easy transportation. Fuel availability is also important. Consider stoves that use common fuels like butane or propane.
Cooking Pot
A durable cooking pot serves multiple purposes. It can be used for boiling water, cooking meals, or even baking. Opt for stainless steel or cast iron for durability. Ensure it's lightweight yet sturdy.
Utensils
Pack essential utensils like a spatula, ladle, and serving spoon. These tools help you prepare and serve meals efficiently. Consider multi-functional utensils to save space in your kit.
Can Opener
Canned foods are common in survival kits. A can opener is essential for accessing these foods. Choose a manual, lightweight can opener for reliability and ease of use.
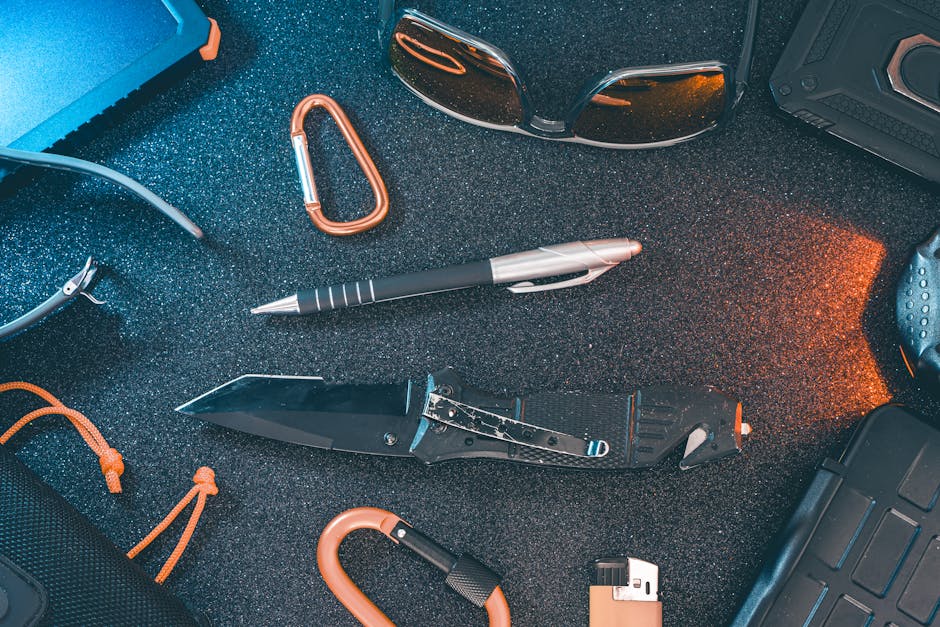
Knife
A good knife is invaluable. Use it for cutting food, opening packages, and other tasks. Choose a sharp, sturdy knife with a comfortable grip. A folding knife is ideal for space-saving.
Fire Starter
A fire starter is crucial for emergencies. It helps ignite a stove or create a fire for cooking. Consider waterproof matches, lighters, or a ferrocerium rod. Ensure you have backup options.
Collapsible Water Container
Storing and transporting water is vital. A collapsible water container saves space when not in use. Look for BPA-free materials and a secure lid.
Cleaning Supplies
Include a small sponge and biodegradable soap. Keeping your cooking tools clean is important for hygiene. A quick-dry towel is also useful for drying items.
Including Essential Utensils
Creating a food survival kit means thinking about more than just food. Essential utensils are crucial for preparing and eating meals efficiently. Without them, even the best food supplies can be hard to use. Here, we guide you through the must-have utensils for your survival kit.
1. Sturdy Knife
A sturdy knife is a survival kit's backbone. It helps cut, peel, and open packages. Choose one with a strong handle and sharp blade. Consider a folding knife to save space.
2. Multipurpose Spork
A spork combines the benefits of a spoon and fork. It's lightweight and easy to pack. A spork handles both solid and liquid foods. Look for one made of durable material.
3. Can Opener
Canned foods are common in survival kits. A can opener ensures you can access them. Choose a manual one; it's reliable and doesn't need electricity.
4. Portable Cutting Board
A cutting board protects surfaces when chopping. Opt for a small, portable version. It should be easy to clean and fit in your kit.
5. Cooking Pot Or Pan
Cooking pots or pans are essential for preparing hot meals. Choose a lightweight option with a secure lid. It should be durable and easy to clean.
6. Heat-resistant Gloves
Heat-resistant gloves protect your hands when cooking. They are crucial if you need to handle hot pots. Ensure they are flexible and durable.
7. Reusable Water Bottle
A reusable water bottle is vital for hydration. It should be sturdy and easy to clean. Look for one with a reliable seal to prevent leaks.
8. Compact Utensil Set
A compact utensil set includes a fork, spoon, and knife. Choose one that nests together. It saves space and keeps your kit organized.
Packing Health And Hygiene Supplies
Preparing a food survival kit involves more than just food. Health and hygiene supplies play a crucial role. They ensure safety and well-being during emergencies. This section focuses on selecting and packing the right supplies. Proper hygiene prevents illness and maintains morale.
Choosing Essential Hygiene Items
Include items like soap, toothpaste, and toothbrushes. These basics maintain personal cleanliness. Wet wipes and hand sanitizer are vital. They offer quick cleaning without water. Choose compact, travel-size products. They save space and are easier to pack.
Consider Sanitary Needs
Pack items for specific needs. Women may require sanitary products. Choose items with long shelf life. This ensures readiness anytime. Consider including disposable razors and deodorant. These enhance comfort in tough situations.
First-aid Supplies
A small first-aid kit is crucial. Include band-aids, antiseptic wipes, and pain relievers. A thermometer and tweezers can be useful. Consider adding personal prescriptions. Ensure they are up to date.
Water Purification Solutions
Clean water is vital for health. Pack water purification tablets or filters. These ensure safe drinking water. Staying hydrated is essential for survival. Contaminated water can lead to illness.
Storage Tips For Longevity
Store supplies in a waterproof container. This protects them from elements. Label each item with expiration dates. Rotate items periodically. This keeps your kit fresh and ready.
Organizing And Labeling
Creating a food survival kit is essential for emergencies. Proper organization and labeling ensure easy access. It also extends the shelf life of your supplies. With clear labels and a well-ordered system, you can find what you need quickly. This can be crucial during a crisis.
Use Transparent Containers
Transparent containers allow you to see contents at a glance. You can quickly check inventory without opening each container. This helps maintain freshness and reduce waste.
Group Similar Items Together
Keep similar items in designated sections. Group canned goods, dry grains, and snacks separately. This makes finding items faster and easier.
Label Everything Clearly
Use waterproof labels to mark each container. Include the item name and expiration date. This prevents confusion and helps with inventory management.
Organize By Expiration Date
Place items with the nearest expiration date at the front. Consume these items first to avoid spoilage. This simple method ensures nothing goes to waste.
Maintain A Checklist
Keep a checklist of all items in your kit. Update it regularly to track usage and replenishment. This ensures your kit is always ready for emergencies.
Storage Tips
Creating your own food survival kit is a smart step. Proper storage is crucial to keep your supplies fresh and safe. With the right techniques, you can extend the shelf life of your essentials. Let's explore some easy and effective storage tips for your survival kit.
1. Choose The Right Containers
Opt for airtight containers. They keep moisture and pests away. Glass jars and plastic bins work well. Avoid containers that might break or leak. Check seals regularly to ensure they remain intact.
2. Store In A Cool, Dark Place
Heat and light reduce the shelf life of food. Find a cool, dark place for your kit. Basements or closets are good choices. Avoid areas near stoves or windows.
3. Use Labels And Dates
Label each item with its name and date of storage. This helps you track expiration dates. Rotate items regularly. Use the oldest items first to prevent waste.
4. Keep Away From Chemicals
Store food away from chemicals and cleaning supplies. They can contaminate your food. Choose a separate space for your survival kit.
5. Monitor Temperature And Humidity
Use a thermometer to check the temperature of your storage area. Aim for a consistent temperature. Use desiccants to control humidity. This prevents mold and spoilage.
6. Inspect Regularly
Check your kit every few months. Look for signs of spoilage or pests. Replace any damaged or expired items. This keeps your kit ready for emergencies.
Regular Maintenance And Updates
Creating a food survival kit is only the first step. Regular maintenance and updates keep your kit ready for emergencies. Items can expire, and your dietary needs may change. Regular checks ensure everything stays fresh and useful.
Check Expiration Dates
Food items have expiration dates. Check them often. Replace expired goods immediately. Fresh food ensures you have safe meals during emergencies.
Rotate Your Supplies
Use a rotation system. Eat older items before they expire. Replace them with new ones. This keeps your kit fresh and ready.
Update Based On Dietary Needs
Dietary needs can change. Check your kit for suitable items. Ensure it has foods you can eat safely. Adjust your supplies as needed.
Account For Seasonal Changes
Weather impacts food storage. Consider the season when updating your kit. In summer, heat affects shelf life. In winter, cold may preserve items longer. Adapt your supplies accordingly.
Review Emergency Tools
Emergency tools must be in good condition. Check them regularly. Ensure batteries work and tools are intact. A functional kit is crucial during emergencies.
Keep Track Of Inventory
Maintain a list of items in your kit. Note what needs replacing. This helps keep your kit organized. You know what you have and what you need.
Plan Regular Checks
Set a schedule for kit inspections. Monthly checks are ideal. They help keep your kit in top shape. Regular updates maintain readiness.
Frequently Asked Questions
What Items Should A Food Survival Kit Include?
A food survival kit should include non-perishable items like canned goods, dried fruits, nuts, and grains. Ensure you have enough water, vitamins, and cooking supplies. Consider adding a manual can opener, utensils, and basic spices for flavor. Check expiration dates regularly and rotate stock to maintain freshness.
How Long Can A Survival Kit Last?
A well-prepared food survival kit can last up to two weeks. Choose items with long shelf lives to extend duration. Regularly check expiration dates and rotate your supplies. Proper storage, like cool and dry places, helps maintain food quality and safety for longer periods.
Can You Customize A Food Survival Kit?
Yes, customizing a food survival kit is possible and advisable. Tailor it to your dietary needs and preferences. Consider allergies and favorite foods for comfort during emergencies. Ensure nutritional balance by including proteins, carbs, and fats. Regularly update your kit as your dietary needs change.
Why Are Non-perishable Foods Important?
Non-perishable foods are crucial in a survival kit due to their long shelf life. They withstand storage without refrigeration, making them ideal for emergencies. Stocking non-perishable items ensures your food supply remains edible and safe over extended periods, providing essential nutrients when fresh food isn't available.
Conclusion
Creating a food survival kit is smart. It prepares you for emergencies. You save time and stress during difficult moments. Remember to pack nutritious, long-lasting foods. Store them properly to avoid spoilage. Include water and essential supplies. Regularly check expiration dates.
Rotate items to keep them fresh. With a well-stocked kit, you ensure peace of mind. You are ready for unexpected situations. Preparation is key. Start building your kit today. It's a simple step towards safety. Stay proactive and secure your future.
Your family will thank you.